iCon Developer Guide
Acknowledgements
Much of our code was based off of the original AB3 code, we refactored it to match the context in our product.
Setting up, getting started
Refer to the guide Setting up and getting started.
Design
Architecture
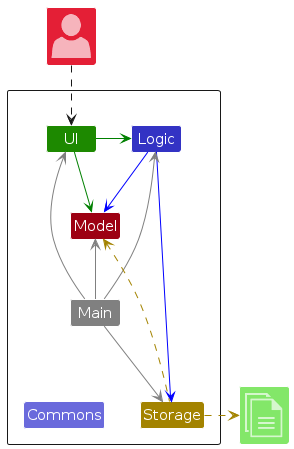
The Architecture Diagram given above explains the high-level design of the App.
Given below is a quick overview of main components and how they interact with each other.
Main components of the architecture
Main (consisting of classes Main and MainApp) is in charge of the app launch and shut down.
- At app launch, it initializes the other components in the correct sequence, and connects them up with each other.
- At shut down, it shuts down the other components and invokes cleanup methods where necessary.
The bulk of the app's work is done by the following four components:
UI: The UI of the App.Logic: The command executor.Model: Holds the data of the App in memory.Storage: Reads data from, and writes data to, the hard disk.
Commons represents a collection of classes used by multiple other components.
How the architecture components interact with each other
The Sequence Diagram below shows how the components interact with each other for the scenario where the user issues the command remove_contact ic:T1234567A.
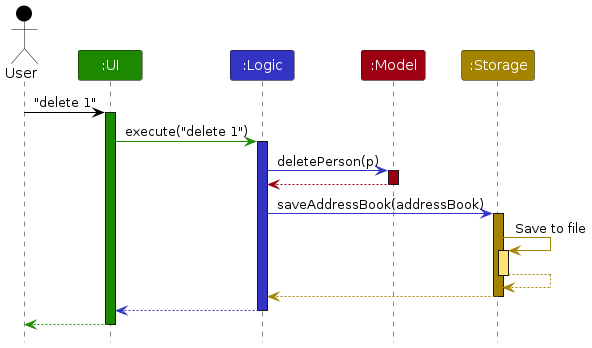
Each of the four main components (also shown in the diagram above),
- defines its API in an
interfacewith the same name as the Component. - implements its functionality using a concrete
{Component Name}Managerclass (which follows the corresponding APIinterfacementioned in the previous point).
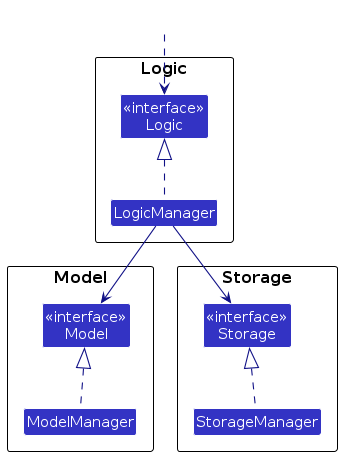
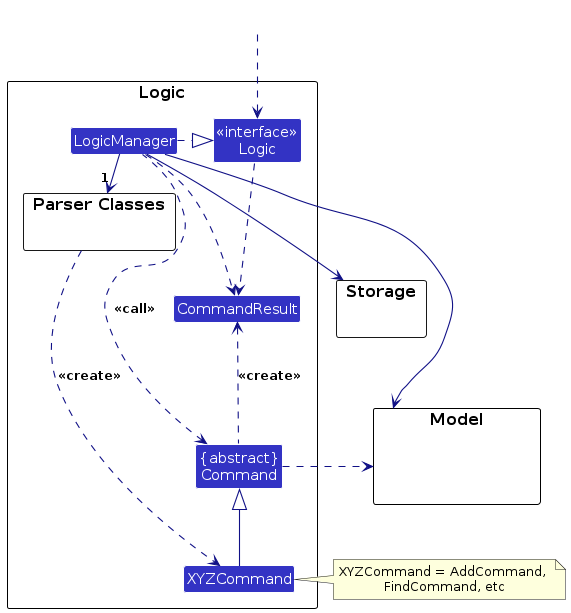
For example, the Logic component defines its API in the Logic.java interface and implements its functionality using the LogicManager.java class which follows the Logic interface. Other components interact with a given component through its interface rather than the concrete class (reason: to prevent outside components being coupled to the implementation of a component), as illustrated in the (partial) class diagram below.
The sections below give more details of each component.
UI component
The API of this component is specified in Ui.java
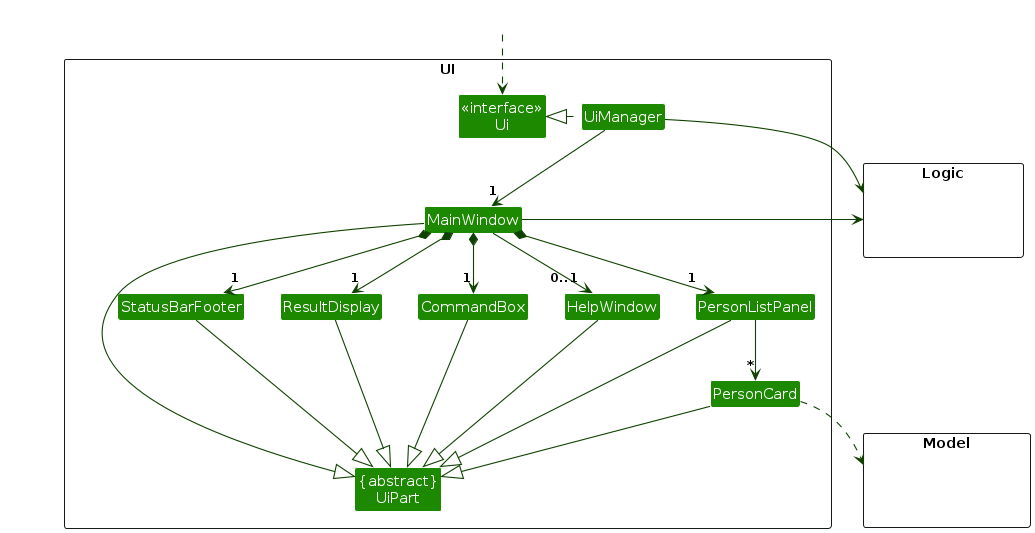
The UI consists of a MainWindow that is made up of parts e.g.CommandBox, ResultDisplay, ListPanel, StatusBarFooter etc. All these, including the MainWindow, inherit from the abstract UiPart class which captures the commonalities between classes that represent parts of the visible GUI. The ListPanel comprises of AppointmentListPanel, ContactListPanel, ContractListPanel and PolicyListPanel, represented by XYZListPanel
The UI component uses the JavaFx UI framework. The layout of these UI parts are defined in matching .fxml files that are in the src/main/resources/view folder. For example, the layout of the MainWindow is specified in MainWindow.fxml
The UI component,
- executes user commands using the
Logiccomponent. - listens for changes to
Modeldata so that the UI can be updated with the modified data. - keeps a reference to the
Logiccomponent, because theUIrelies on theLogicto execute commands. - depends on some classes in the
Modelcomponent, as it displaysContactobject residing in theModel.
Logic component
API : Logic.java
Here's a (partial) class diagram of the Logic component:
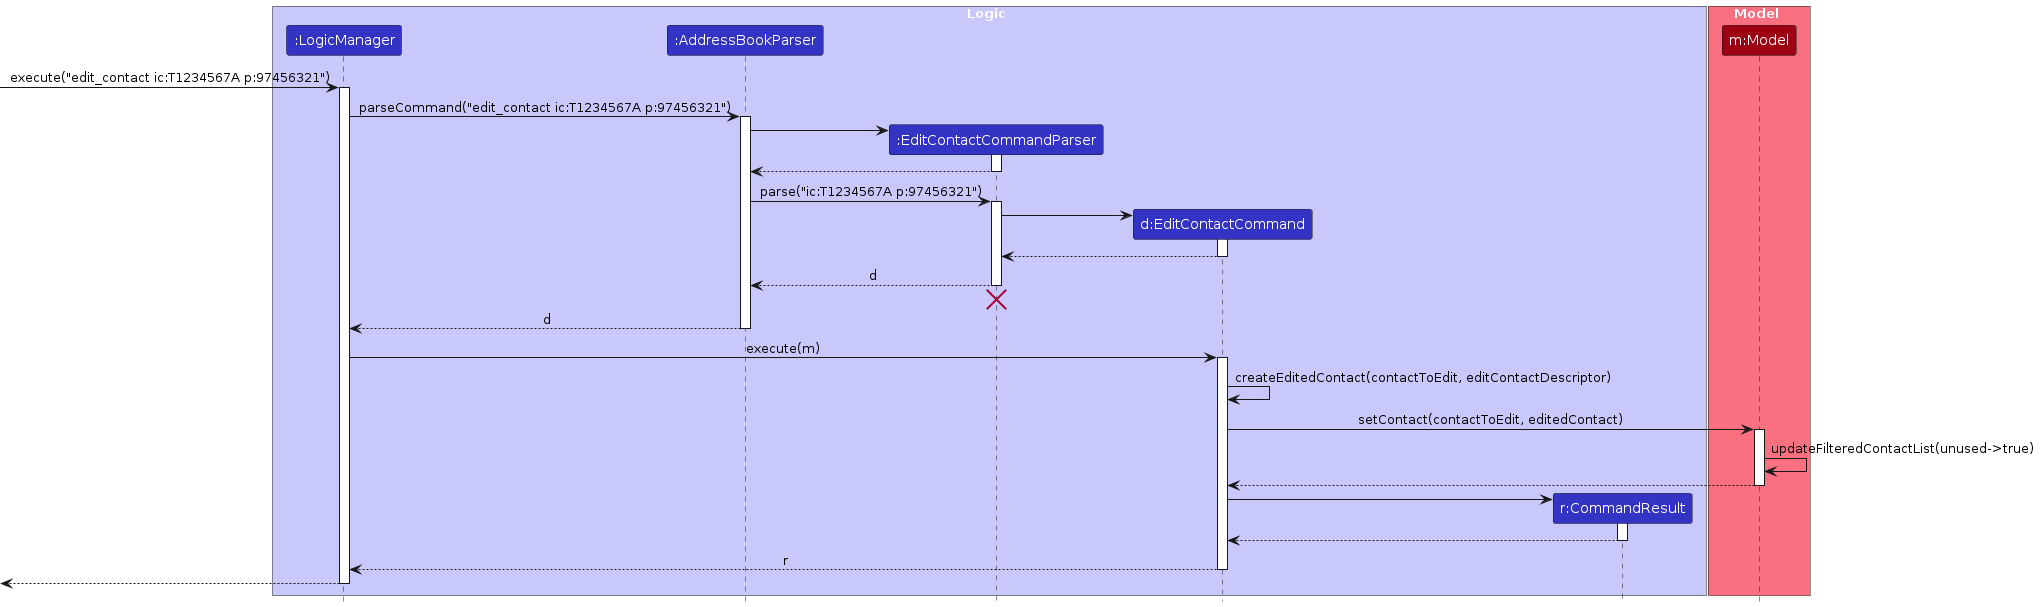
The sequence diagram below illustrates the interactions within the Logic component, taking execute("remove_contact ic:T1234567A") API call as an example.
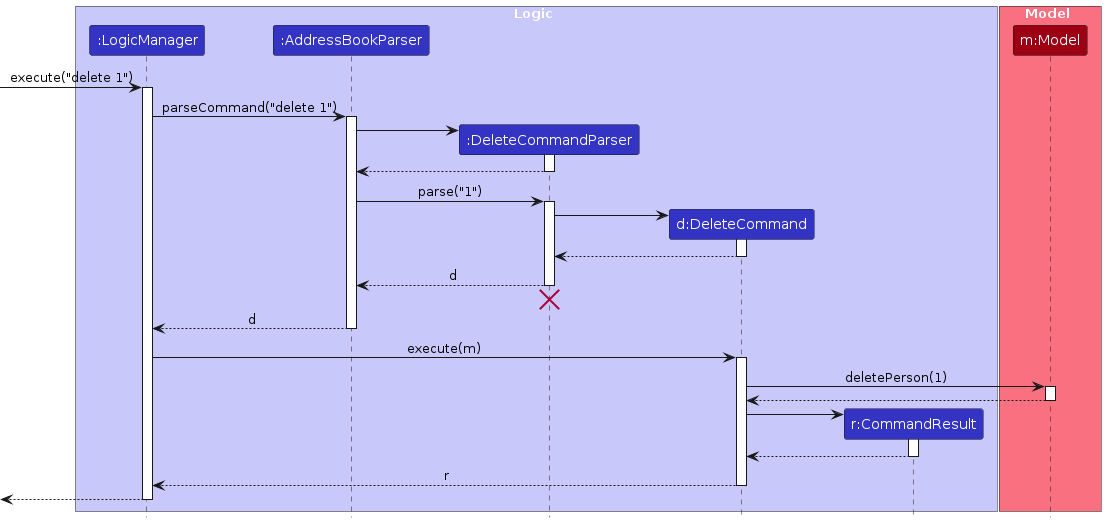
Note: The lifeline for RemoveContactCommandParser should end at the destroy marker (X) but due to a limitation of PlantUML, the lifeline continues till the end of diagram.
How the Logic component works:
- When
Logicis called upon to execute a command, it is passed to anAddressBookParserobject which in turn creates a parser that matches the command (e.g.,RemoveContactCommandParser) and uses it to parse the command. - This results in a
Commandobject (more precisely, an object of one of its subclasses e.g.,RemoveContactCommand) which is executed by theLogicManager. - The command can communicate with the
Modelwhen it is executed (e.g. to remove a contact).
Note that although this is shown as a single step in the diagram above (for simplicity), in the code it can take several interactions (between the command object and theModel) to achieve. - The result of the command execution is encapsulated as a
CommandResultobject which is returned back fromLogic.
Here are the other classes in Logic (omitted from the class diagram above) that are used for parsing a user command:
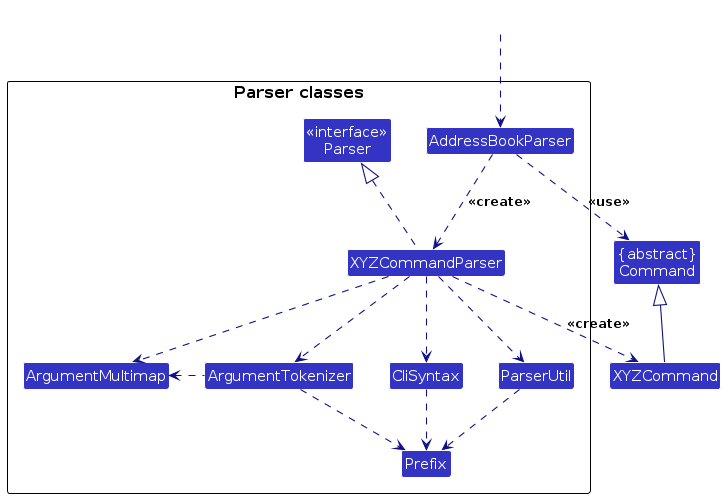
How the parsing works:
- When called upon to parse a user command, the
AddressBookParserclass creates anXYZCommandParser(XYZis a placeholder for the specific command name e.g.,AddContactCommandParser) which uses the other classes shown above to parse the user command and create aXYZCommandobject (e.g.,AddContactCommand) which theAddressBookParserreturns back as aCommandobject. - All
XYZCommandParserclasses (e.g.,AddContactCommandParser,RemoveContactCommandParser, ...) inherit from theParserinterface so that they can be treated similarly where possible e.g, during testing.
Model component
API : Model.java
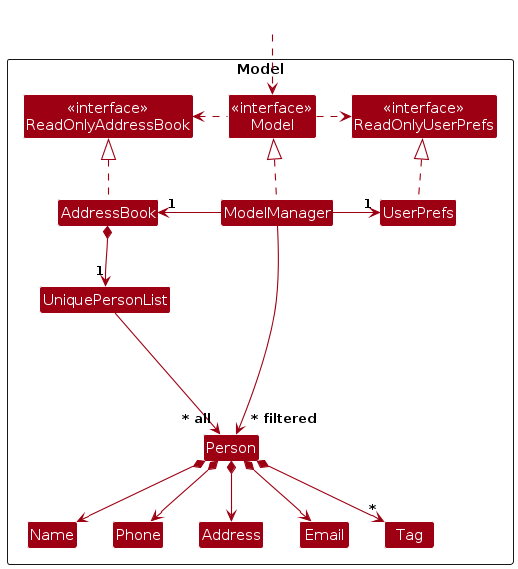
The Model component,
- Stores the address book data i.e., all
Contact,Contract,PolicyandAppointmentobjects (which are contained in aUniqueContactList,UniqueContractList,UniquePolicyListandUniqueAppointmentListobject respectively). Note the diagram only shows the truncated model with Contact as the focus. Contract, Policy and Appointment have been omitted from the diagram, but follow the same logic. - Stores the currently 'selected' objects (e.g., results of a search query) as a separate filtered list which is exposed to outsiders as an unmodifiable
ObservableList<>that can be 'observed' e.g. the UI can be bound to this list so that the UI automatically updates when the data in the list change. For example,view_contact ic:T1234567Awill returnObservableList<Contact>as a filtered list containing the specificContactwithNRIC'T1234567A', given theContactexists within the application data. The respectiveContact,Contract,PolicyandAppointmentobjects are returned in their respectiveObservableList<T>upon their respective command issued. - Stores a
UserPrefobject that represents the user’s preferences. This is exposed to the outside as aReadOnlyUserPrefobjects. - Does not depend on any of the other three components (as the
Modelrepresents data entities of the domain, they should make sense on their own without depending on other components)
Storage component
API : Storage.java
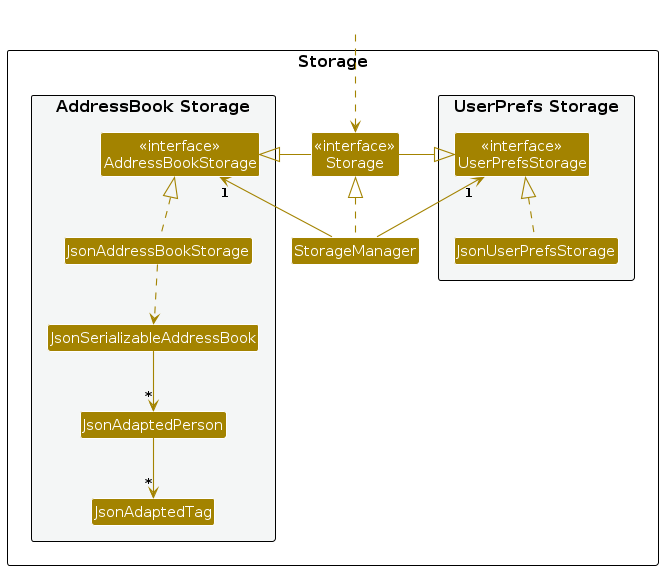
The Storage component,
- can save both iCon data and user preference data in JSON format, and read them back into corresponding objects.
- inherits from both
AddressBookStorageandUserPrefStorage, which means it can be treated as either one (if only the functionality of only one is needed). - depends on some classes in the
Modelcomponent (because theStoragecomponent's job is to save/retrieve objects that belong to theModel)
Common classes
Classes used by multiple components are in the seedu.address.commons package.
Implementation
This section describes some noteworthy details on how certain features are implemented.
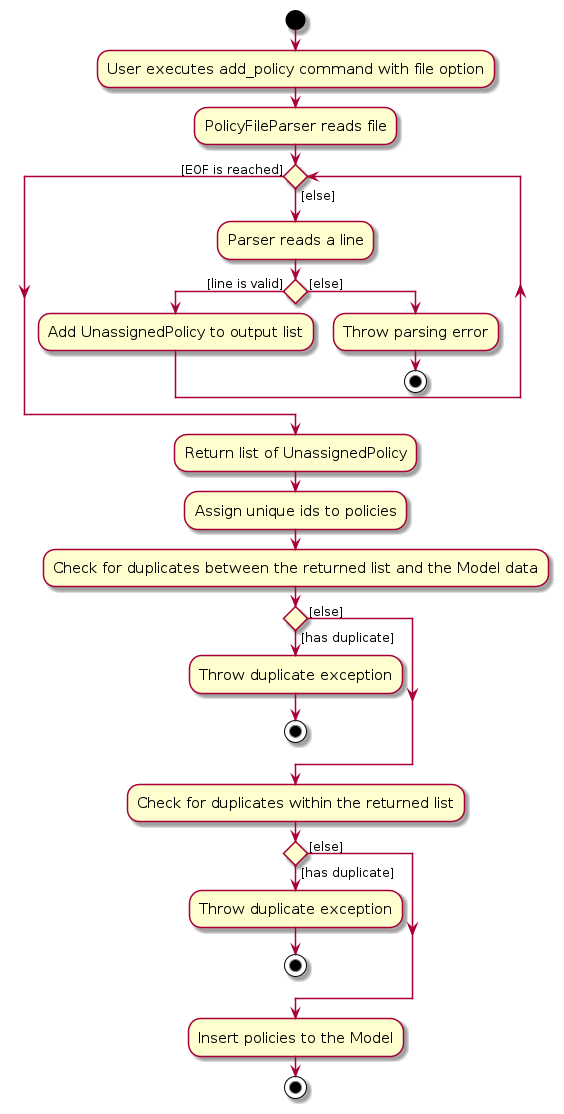
Add policies from file feature
The add_policy command allows users to add multiple policies at once, loaded from a file.
There were a few alternative behaviours and implementations that were considered when a user adds multiple policies from a file.
First, when an invalid line is read from the file, it was chosen that previous valid lines are ignored instead of adding all policies until an invalid input. This decision was made so the user will not have issues re-adding the same file later and encountering an error about duplicate policies from having the same name and details.
An important consideration when implementing this is since policies and other data in iCon are assigned and identified
by a unique alphanumeric string ID, there is a need for Model to generate new random ids not yet present in iCon.
Therefore, in implementation, the class UnassignedPolicy was created to facilitate the above described behaviour. The
parser class PolicyFileParser parses and returns UnassignedPolicy objects before they are assigned ids, which are
compared with each other and within existing policies for duplicates. Once all lines are parsed and checks are passed
does the Model only create PolicyIds and assigns and adds the policies to iCon.
The following activity diagram describes the expected behaviour when a user executes the add_policy command
with the file option:
The alternative was to simply treat each line as its own or similar to an AddPolicyCommand, but this does not
as easily implement the desired behaviour.
Sorting data in the view
iCon allows users to sort their current view of data using sort_* commands atop of filtering results with view_*
commands. Inspired by CLI syntax, options were chosen to be represented as flags, such as -a and -i.
Upon implementation, an additional layer using JavaFX's SortedList<T> was added atop the FilteredList<T>. This is
what allows the user to apply a filter and a sort, which then gets displayed.
One consideration when implementing was to consider what type the Command object should permit. JavaFX specifies a
Comparator<T> type to determine how to sort the ObservableList<T>. It further allows the null value to signify
insertion order. The allowance of null as a comparator may make it may be unclear to future developers if
Comparator<T> was directly used as the type needed by the Command.
Therefore, it was chosen to have an enumeration for the different applicable sorting types, which encloses the null
comparator to a more descriptive UNORDERED enum, and which allows non-null checking. This has the additional benefit
of making it clear to developers what types of sorting options there are, instead of being able to directly define any
Comparator<T>.
Edit Feature
Implementation
The edit feature is managed by the respective EditFIELDCommand classes.
Implementation is pretty similar for the three classes, hence using edit_contact as an example
to demonstrate the structure of the implementation.
How it works:
- When
edit_contact ic:NRIC [fields to edit]is called, it is fed throughEditContactCommandParserfirst, Then, the parser checks for the presence of theNRICidentifying field and at least one other editable field. The parser parses the fields as String initially, then converts the ic string into anNricobject. Then, it converts the editable field strings into anEditContactDescriptorobject. EditContactCommandParserwill now pass theNricandEditContactDescriptorinto aEditContactCommandconstructor- The
EditContactCommandwill then be executed, which start with getting a unique contact list - After that, we check if
Nricis in the unique contact list, if not, we throw aCommandExceptionwithMESSAGE_CONTACT_NOT_FOUND - Following, we find the
contactToEditand create a new ContacteditedContactwith since contact is immutable. - We then do a check to make sure we put in accurate data, we check if
editedContactis in iCon (by checkingNric). - We then replace
contactToEditwitheditedContactand update the filtered contact list to show all contacts - We then return a
CommandResultto signify successful command execution.
How to apply to other commands:
- Identifying fields are different for different commands. Contact:
Nric, Contract:CId, Policy:PId, Appointment:AId. - Replace all
contactwith the field you are trying to edit e.geditContactCommand->editPolicyCommand
Documentation, logging, testing, configuration, dev-ops
Appendix: Requirements
Product scope
Target user profile:
Independent Insurance Agents who manage the personal portfolio of clients, contracts and insurance policies.
Value proposition:
iCon helps insurance agents manage a large pool of clients and contracts, with the flexibility to add policies from any issuer. By enabling fast, accurate retrieval of critical client and policy data, it minimizes admin overhead and let agents focus more on delivering high-quality advisory services.
User stories
Priorities: High (must have) - * * *, Medium (nice to have) - * *, Low (unlikely to have) - *
| Priority | As a … | I want to … | So that I can … |
|---|---|---|---|
* * * | Insurance Agent | add a contact | store new client information for future reference |
* * * | Insurance Agent | remove a contact | delete outdated or irrelevant client records |
* * * | Insurance Agent | view a contact | review a client’s personal and contact details quickly |
* * * | Insurance Agent | add a policy | expand the list of available insurance policy types |
* * * | Insurance Agent | remove a policy | remove obsolete or discontinued policy types |
* * * | Insurance Agent | view a policy | see policy coverage and terms in detail |
* * * | Insurance Agent | add a contract | link a specific policy to a client |
* * * | Insurance Agent | remove a contract | delete outdated or invalid client contracts |
* * * | Insurance Agent | view a contract | review contract details, including the policy type and the client involved |
* * | Insurance Agent | search for a contact | quickly pull up contact details for reference |
* * | Insurance Agent | search for a contract | quickly reference contract details |
* * | Insurance Agent | tag a contact | label contacts with follow-up notes or categories for better organization |
* * | Insurance Agent | add client appointments | schedule meetings or follow-ups with clients |
* * | Insurance Agent | remove client appointments | cancel or correct appointments as needed |
* * | Insurance Agent | view client appointments | view upcoming or past meetings with clients |
* * | Insurance Agent | add contract expiry | plan follow-ups before a client’s policy expires |
* * | Insurance Agent | add contract premium | reference premium rates when discussing options with clients |
* * | Insurance Agent | edit a contract | update any incorrect or changed details in a client’s contract |
* * | Insurance Agent | edit a contact | correct or update client information |
* * | Insurance Agent | edit a policy’s details | ensure policy information remains accurate and up-to-date |
* | Insurance Agent | sort my contacts alphabetically by name | find a specific client’s record quickly when speaking with them |
* | Insurance Agent | sort my contracts by expiry date | review which contracts need attention or follow-ups soonest |
* | Insurance Agent | edit client appointments | reschedule meetings or mark them as completed |
* | Insurance Agent | sort my appointments by date | easily reference upcoming or recent appointments |
* | Insurance Agent | search for an appointment | quickly look up details of a client meeting or follow-up |
Use cases
(For all use cases below, the System is iCon and the Actor is the user, unless specified otherwise)
Use Case: UC1 - Add a contact
MSS
User requests to add a contact with all details specified
iCon adds the contact
Use case ends.
Extensions
1a. Some compulsory details are missing.
1a1. iCon shows an error message.
Use case ends.
1b. The contact is duplicate.
1b1. iCon shows an error message.
Use case ends.
Use case: UC2 - Remove a contact
MSS
User requests to remove a specific contact in the list by NRIC
iCon removes the contact
Use case ends.
Extensions
1a. The given NRIC is invalid.
1a1. iCon shows an error message.
Use case ends.
1b. There is no contact stored with the given NRIC.
1b1. iCon shows an error message.
Use case ends.
1c. The contact to be removed is linked to existing contracts.
1c1. iCon shows an error message.
Use case ends.
1d. The contact to be removed is linked to existing appointments.
1d1. iCon shows an error message.
Use case ends.
Use Case: UC3 - Edit a contact's details
MSS
User requests to edit a specific contact in the list by NRIC
iCon updates the contact's details
Use case ends.
Extensions
1a. The given NRIC is invalid or missing.
1a1. iCon shows an error message.
Use case ends.
1b. Valid NRIC but no details to be edited.
1b1. iCon shows an error message.
Use case ends.
1c. There is no contact stored with the given NRIC.
1c1. iCon shows an error message.
Use case ends.
Use Case: UC4 - View contacts by NRIC
MSS
User requests to view contacts by NRIC
iCon shows a list contacts that matches the NRIC exactly
Use case ends.
Extensions
1a. The given NRIC is missing.
1a1. iCon shows an error message.
Use case ends.
2a. No contacts found.
2a1. iCon shows an empty list.
Use case ends.
Use Case: UC5 - View all contacts
MSS
User requests to view contacts
iCon shows a list of contacts
Use case ends.
Extensions
2a. The list is empty.
2a1. iCon shows an empty list.
Use case ends.
Use Case: UC6 - Clear all data
MSS
User requests to clear all data
iCon clears all data
Use case ends.
Use Case: UC7 - Exit the App
MSS
User requests to exit the App
iCon saves all data to hard disk
iCon exits
Use case ends.
Extensions
2a. iCon fails to save data to hard disk.
2a1. iCon shows an error message.
Use case resumes at step 3.
Use Case: UC8 - Add Policy
MSS
User adds policy with all compulsory details specified
iCon adds the policy
iCon shows a success message & returns a policy ID to the user
Use case ends.
Extensions
1a. Not all compulsory details are specified.
1a1. iCon shows an error message.
Use case ends.
Use Case: UC9 - Add Policies (from file path)
MSS
User adds policies using file path
iCon adds the policies
iCon shows a success message
Use case ends.
Extensions
1a. File path is invalid or file not found.
1a1. iCon shows an error message.
Use case ends.
Use case: UC10 - Remove Policy
MSS
User requests to remove a specific policy in the list by policy ID
iCon removes the policy
Use case ends.
Extensions
1a. The given ID is invalid.
1a1. iCon shows an error message.
Use case ends.
2a. The policy to be deleted is linked to existing contracts.
2a1. iCon shows an error message.
Use case ends.
2b. There is no policy stored with the given ID.
2b1. iCon shows an error message.
Use case ends.
Use Case: UC11 - Edit Policy
MSS
User requests to edit a specific policy in the list by policy ID with some or all details specified
iCon updates the policy's details
Use case ends.
Extensions
1a. The given ID is invalid or missing.
1a1. iCon shows an error message.
Use case ends.
1b. Valid ID but no details to be edited.
1b1. iCon shows an error message.
Use case ends.
2a. There is no policy stored with the given ID.
2a1. iCon shows an error message.
Use case ends.
2b. Edited details result in a duplicate of an existing policy.
2b1. iCon shows an error message.
Use case ends.
Use Case: UC12 - View Specific Policies
MSS
User requests to view specific policies by policy ID substrings
iCon shows a list of policies that match the policy ID substrings
Use case ends.
Extensions
1a. There is no given search substring.
1a1. iCon shows an error message.
Use case ends.
2a. The list is empty.
2a1. iCon shows an empty list.
Use case ends.
Use Case: UC13 - View All Policies
MSS
User requests to view all policies
iCon shows a list of policies
Use case ends.
Extensions
2a. The list is empty.
2a1. iCon shows an empty list.
Use case ends.
Use Case: UC14 - Sort Policies
MSS
User requests to sort policies by a given flag
iCon shows a sorted list of policies
Use case ends.
Extensions
1a. The given flag is invalid or missing.
1a1. iCon shows an error message.
Use case ends.
Use Case: UC15 - Add contract
MSS
User adds contract with specific details
iCon adds the contract
iCon shows a success message & returns a contract ID to the user
Use case ends.
Extensions
1a. Some compulsory details are missing.
1a1. iCon shows an error message.
Use case ends.
2a. The NRIC is invalid.
2a1. iCon shows an error message.
Use case ends.
2b. The policy ID is invalid.
2b1. iCon shows an error message.
Use case ends.
2c. The contract is duplicate.
2c1. iCon shows an error message.
Use case ends.
2d. The contract period is invalid.
2d1. iCon shows an error message.
Use case ends.
2e. The date format is invalid.
2e1. iCon shows an error message.
Use case ends.
2f. The premium amount is invalid.
2f1. iCon shows an error message.
Use case ends.
Use Case: UC16 - Remove contract
MSS
User requests to remove a specific contract in the list by contract ID
iCon removes the contract
Use case ends.
Extensions
1a. The given ID is invalid.
1a1. iCon shows an error message.
Use case ends.
2a. There is no contract stored with the given ID.
2a1. iCon shows an error message.
Use case ends.
Use Case: UC17 - Edit contract
MSS
User requests to edit a specific contract in the list by contract ID with some or all details specified
iCon updates the contract's details
Use case ends.
Extensions
1a. The given ID is invalid or missing.
1a1. iCon shows an error message.
Use case ends.
1b. Valid ID but no details to be edited.
1b1. iCon shows an error message.
Use case ends.
2a. There is no contract stored with the given ID.
2a1. iCon shows an error message.
Use case ends.
2b. Edited details are invalid.
2b1. iCon shows an error message.
Use case ends.
2c. Edited details result in a duplicate of an existing contract.
2c1. iCon shows an error message.
Use case ends.
Use Case: UC18 - View specific contracts
MSS
User requests to view details of a specific contract in the list by ID
iCon shows the contract's details that matches the ID given
Use case ends.
Extensions
1a. There is no given ID.
1a1. iCon shows an error message.
Use case ends.
2a. The list is empty.
2a1. iCon shows an empty list.
Use case ends.
Use Case: UC19 - View all contracts
MSS
User requests to view all contracts
iCon shows a list of contracts
Use case ends.
Extensions
2a. The list is empty.
2a1. iCon shows an empty list.
Use case ends.
Use Case: UC20 - Sort contracts
MSS
User requests to sort contracts by a given flag
iCon shows a sorted list of contracts
Use case ends.
Extensions
1a. The given flag is invalid or missing.
1a1. iCon shows an error message.
Use case ends.
Use Case: UC21 - Add appointment
MSS
User adds appointment with specific details
iCon adds the appointment
iCon shows a success message
Use case ends.
Extensions
1a. Some compulsory details are missing.
1a1. iCon shows an error message.
Use case ends.
2a. The NRIC is invalid.
2a1. iCon shows an error message.
Use case ends.
2b. The date format is invalid.
2b1. iCon shows an error message.
Use case ends.
3a. Appointment fields matches an exact copy of existing appointment
3a1. iCon shows an error message.
Use case ends.
Use Case: UC22 - Remove appointment
MSS
User requests to remove a specific appointment in the list by Appointment ID
iCon removes the appointment
Use case ends.
Extensions
1a. The given Appointment ID is invalid.
1a1. iCon shows an error message.
Use case ends.
1b. There is no appointment stored with the given Appointment ID.
1b1. iCon shows an error message.
Use case ends.
Use Case: UC23 - Edit appointment
MSS
User requests to edit a specific appointment in the list by Appointment ID with some or all details specified
iCon updates the appointment's details
Use case ends.
Extensions
1a. The given Appointment ID is invalid or missing.
1a1. iCon shows an error message.
Use case ends.
1b. Valid Appointment ID but no details to be edited.
1b1. iCon shows an error message.
Use case ends.
2a. There is no appointment stored with the given Appointment ID.
2a1. iCon shows an error message.
Use case ends.
2b. Edited details are invalid.
2b1. iCon shows an error message.
Use case ends.
3a. Edited fields cause edited appointment to match an exact copy of existing Appointment
3a1. iCon shows an error message.
Use case ends.
Use Case: UC24 - View specific appointments
MSS
User requests to view specific appointments by Appointment ID substrings
iCon shows a list of appointments that match the Appointment ID substrings
Use case ends.
Extensions
1a. There is no given search substring.
1a1. iCon shows an error message.
Use case ends.
2a. The list is empty.
2a1. iCon shows an empty list.
Use case ends.
Use Case: UC25 - View all appointments
MSS
User requests to view all appointments
iCon shows a list of appointments
Use case ends.
Extensions
2a. The list is empty.
2a1. iCon shows an empty list.
Use case ends.
Use Case: UC26 - Sort appointments
MSS
User requests to sort appointments by a given flag
iCon shows a sorted list of appointments
Use case ends.
Extensions
1a. The given flag is invalid or missing.
1a1. iCon shows an error message.
Use case ends.
Non-Functional Requirements
- The system should work on any mainstream OS (excluding MacOS, see point 2) as long as it has Java
17installed. - The system should work on MacOS as long as it has a specific Java
17configurationJava 17 JDK+FX Azul distribution. - The application should be easily installable, with no additional third-party dependencies.
- The application should function entirely offline.
- The system should be able to hold up to 1000 contacts, contracts, and policies without a noticeable sluggishness in performance for typical usage - load time under 1 second.
- The system should respond to user input and commands within 100 milliseconds.
- The system should manage its own copy of policies separate from the source file when adding or removing policies.
- The save data should not take more than 100 MB in typical usage.
- The system must save changes to the hard disk after 1 or a few user modifications and after exiting the program, to minimize data loss in the event of a crash.
- A user with above average typing speed (50 WPM) for regular English text (i.e. not code, not system admin commands) should be able to accomplish most of the tasks faster using commands than using the mouse.
Glossary
- Mainstream OS: Windows, Linux, Unix, MacOS
- Contact: A customer of the insurance agent that has data fields and is identified by NRIC
- Policy: The document that details the terms and conditions of a contract and is identified by
POLICY_ID - Contract: A contract that binds a customer to a certain policy and is identified by
CONTRACT_ID - Appointment: A scheduled event between the user (insurance agent) and a Contact, with a date, time, and associated NRIC, identified by
APPOINTMENT_ID - NRIC: National Registration Identity Card. A unique identifier used to link a Contact to their associated Contracts and Appointments.
Appendix: Instructions for manual testing
Given below are instructions to test the app manually.
Note: These instructions only provide a starting point for testers to work on; testers are expected to do more exploratory testing.
Launch
Initial launch
1.1. Download the jar file and copy into an empty folder
1.2. Double-click the jar file
1.3. Expected: Shows the GUI with a set of sample contacts. The window size may not be optimum.
- Note: For mac and linux users, use the terminal and
cdto the directory where the jar file is located. Then, runjava -jar iCon.jar
Saving window preferences
2.1. Resize the window to an optimum size. Move the window to a different location. Close the window.
2.2. Re-launch the app by double-clicking the jar file.
Expected: The most recent window size and location is retained.Start Clean:
clear
Contact management
Add two contacts. The list should update immediately
1.1.
add_contact n:Bob Lim p:81112222 ic:G1234567B e:bob@example.com a:456 MBS1.2.
add_contact n:Alice Tan p:91234567 ic:S9876543A e:alice@example.com a:123 Orchard RoadSort contacts by alphabetical sort.
sort_contact -a. 2.1. The list should re-order to show Alice first, then Bob.Edit contact by NRIC to change fields such as phone number.
3.1.
edit_contact ic:G1234567B p:88888888View a specific contact: View by NRIC. Only Bob's details should be displayed
4.1.
view_contact ic:G1234567BRemove a contact: Remove Bob using his NRIC. The list should update, leaving only Alice.
5.1.
remove_contact ic:G1234567B
Policy management
Add two new policies.
1.1.
add_policy n:Premium Health d:Covers all hospital stays and specialist visits1.2.
add_policy n:Basic Car d:Covers basic third-party car damageAdd policy from file.
2.1. Create a file named
policy_file.txtin the same folder as your .jar file.2.2. Put this text inside that file:
Life Insurance`This policy coverage for family...2.3. Now, run the command:
add_policy f:policy_file.txtView all policies. The list should show all 3 policies added. Note the POLICY_IDs (eg. P1234A) assigned by the system in the GUI. Hence, tailor the
POLICY_IDto the randomly generated policy ID as shown in the GUI3.1.
view_policy -aEdit a policy. Use the
POLICY_IDfor "Premium Health" (eg. P1234A) to edit it4.1.
edit_policy p:P1234A n:Premium Health GoldRemove the Basic Car policy using the
POLICY_ID(eg. P5678B)5.1.
remove_policy p:P5678B
Contract management
Setup: We should have "Alice" (NRIC S9876543A) and a Policy (eg. P1234A for "Premium Health Gold", refer to the
POLICY_IDin the GUI).Add a new contract for Alice with the policy.
2.1.
add_contract p:P1234A ic:S9876543A dt:2024-01-01 e:2025-01-01 pr:1200.50Add a contract (Bad expiry date): This command should fail because the expiry date is before the signed date
3.1.
add_contract p:P1234A ic:S9876543A dt:2025-01-01 e:2024-01-01 pr:1003.2. The error message: "Signing date comes after expiry date" should appear.
Add a contract (Bad premium): This command should fail because premium is not a positive number
4.1.
add_contract p:P1234A ic:S9876543A dt:2024-01-01 e:2025-01-01 pr:-504.2. The error message: "Contract premium should be between 0 and 999999999999.99" should appear.
View all contracts. The list should show the contract added.
5.1.
view_contract -aEdit Contract: Similar to
POLICY_ID, use theCONTRACT_IDassigned by the system (eg. C1234A) to edit the premium6.1.
edit_contract c:C1234A pr:1300.00Remove Contract: Remove the contract you edited (use the
CONTRACT_ID)7.1.
remove_contract c:C1234A
Appointment Management
Setup: We still have "Alice" (NRIC S9876543A) in the contact list.
Add two appointments for Alice.
2.1.
add_appointment ic:S9876543A dt:2025-11-15 d:Discuss contract renewal2.2.
add_appointment ic:S9876543A dt:2025-10-10 d:Initial healthcare reviewAdd appointment (Invalid NRIC): This command should fail because the NRIC does not exist.
3.1.
add_appointment ic:F9999999Z dt:2025-12-01 d:Non-existent contactSort appointments: Sort the appointments by date in ascending order. The "Initial healthcare review" (Oct 10) should now appear before the "contract renewal" (Nov 15).
4.1.
sort_appointment -daEdit appointments: Similar to
POLICY_ID, useAPPOINTMENT_IDfrom the GUI (eg. A1234B) from one of the appointments and change its date5.1.
edit_appointment a:A1234B dt:2025-11-16 d:Sign new contract papersRemove appointment: Remove the appointment you edited (using
APPOINTMENT_ID) (eg. A1234B)6.1.
remove_appointment a:A1234B
Exiting and Relaunching
Exit the app
1.1.
exitRelaunch the app
2.1. After relaunching the app, you should see the existing contacts, policies, contracts and appointments saved previously.